How to Buy and Build a Custom Mechanical Keyboard
A guide written by Matthew Encina and Sam Pak
Click below to jump to a section
Index
01. The Anatomy of a Keyboard
02. Keyboard Feel and Sound
03. How to buy a Mechanical Keyboard
04. Mechanical Keyboard Build Guide
05. Hear from the Community
06. Additional Resources
Introduction
You’ve watched some tasty videos online and have seen beautiful photos on your feed, and now you’re wondering: how do I build my own custom mechanical keyboard, and where do I buy one? This guide is a curated collection of the essential information and tips to help you get started with your first build.
A note from Matthew Encina
When I began, I felt a little overwhelmed and intimidated by the amount of information I needed to consume. But with the guidance of the wonderful folks that make up the enthusiast keyboard community, I was able to find great resources that helped me connect the dots.
This is the guide I wish I had when I was first starting the keyboard hobby. Alongside Sam Pak, we’ve collected the best information we could find to help you navigate your first custom mechanical keyboard build.
I plan on periodically updating this, so feel free to reach out to me via email or social if you have a suggestion for something we should add or edit here. I’m still relatively new to the scene, so I’m using this as a place to collect and curate what I find most helpful.
Some of the links included in this guide are my affiliate links, which I receive a small commission for at no extra cost to you. Thanks for supporting my content.
The Anatomy of a Keyboard
The best place to start is to know all of the parts that make up a keyboard. And the best person to teach you about the subject is keyboard content creator Taeha Types. Watch the following video for a simple overview. As you work your way through this guide, you’ll find more details on each part.
Every keyboard consists of these main components:
Keyboard case to house everything.
PCB (printed circuit board) allows the keyboard to communicate with your computer.
A plate that holds your switches in place.
Stabilizers to support longer keys like spacebar and enter.
Switches, which connect to your PCB.
Keycaps, the face of your keyboard.

Click the plus + to expand the section below
-
If you’re interested in learning about some of the history behind the custom mechanical keyboard scene, check out this wonderful video from Answer in Progress.
Additionally, Taeha gives an answer to “why mechanical keyboards?”
Render by Yuzu Studios
Choosing a Keyboard Size
Many keyboard layouts are available, the most common being 60%, 65%, 75%, TKL (tenkeyless), and 1800. Keyboard designers will generally design from one of these layouts because it’s what most of the community wants. There is also a massive community around ergo style boards such as alice or arisu, split ergo, and ortholinear layout.
Figuring out the layout you want is essential to narrowing what you start looking for. Some things to consider are your use case, space on your desk, and if you’re comfortable with layers within the keyboard.
Are you looking to use this keyboard for coding? Gaming? Or just a keyboard to use every day in any situation? Do you have enough space for a full-size keyboard, or do you need something compact to make ample room for your mouse?
If you’re coming from a full-size layout, consider how often you use the Numpad and function keys. Heavy Numpad users should stick to a 100% or 1800 layout. If function keys are essential to you, you’ll want to get something 75% and above. But upon reflection, you might realize that you rarely use either and are ok with accessing those extra keys via function/layer key; then, you can look into 65% and smaller.
Keyboard Characteristics:
Feel and Sound
Outside of the visual aesthetic of a keyboard, the most common qualities enthusiasts look for are typing feel and sound. The most significant factors that impact these qualities are the keyboard case material and acoustics, mounting system, plate material, switches, and keycaps. The combination of these components shapes how your keyboard will sound and feel.
Keyboard Case
Depending on how the keyboard case is designed and the materials used, it will play a massive role in the overall acoustics of the board. Most keyboards are made out of aluminum, acrylic, or polycarbonate. Mass-produced boards are usually made of ABS plastic and molds to keep production costs down.
Watch the following video by keyboard enthusiast, Keybored, who has a background in aerospace engineering. Here, Scott explains how case material, mass and shape influence sound.
It's a lengthy video, but it covers all of the aspects of how a keyboard's architecture and components influence its sound.
Render by Yuzu Studios
Mounting Systems
Every keyboard comes with a specific mounting system. It’s how your plate and PCB mount to the inside of the case.
Systems that mount directly to the case, like top mount, tend to have a firmer feel. While systems that utilize dampeners (foam, rubber, silicone) to soften contact between your plate and case, like gasket mount, tend to have a more flexible feel. These dampeners can also impact sound by reducing the vibration between your typing and the case.
This cheat sheet by Thomas Baart is helpful to get a sense of many past mounting styles, these days the most common ones you’ll find are variations of o-ring, gasket, and top mount.
Plates
The plate material you choose will significantly impact the feel and sound of your board. There are many to choose from, ranging from soft materials like polycarbonate to stiff materials like carbon fiber.
Another excellent video excerpt from Keybored explains the science behind how a material’s Specific Stiffness affects the sound. Keyboard enthusiast Jason Tsay also posted this table that quantifies the effect of materials on sound and feel.
In simple terms: the stiffer your plate material, the higher-pitched the sound might be. The softer your plate material, the deeper the sound might be.
For your first build, consider using an aluminum or FR4 plate, which sits in the middle of Specific Stiffness.

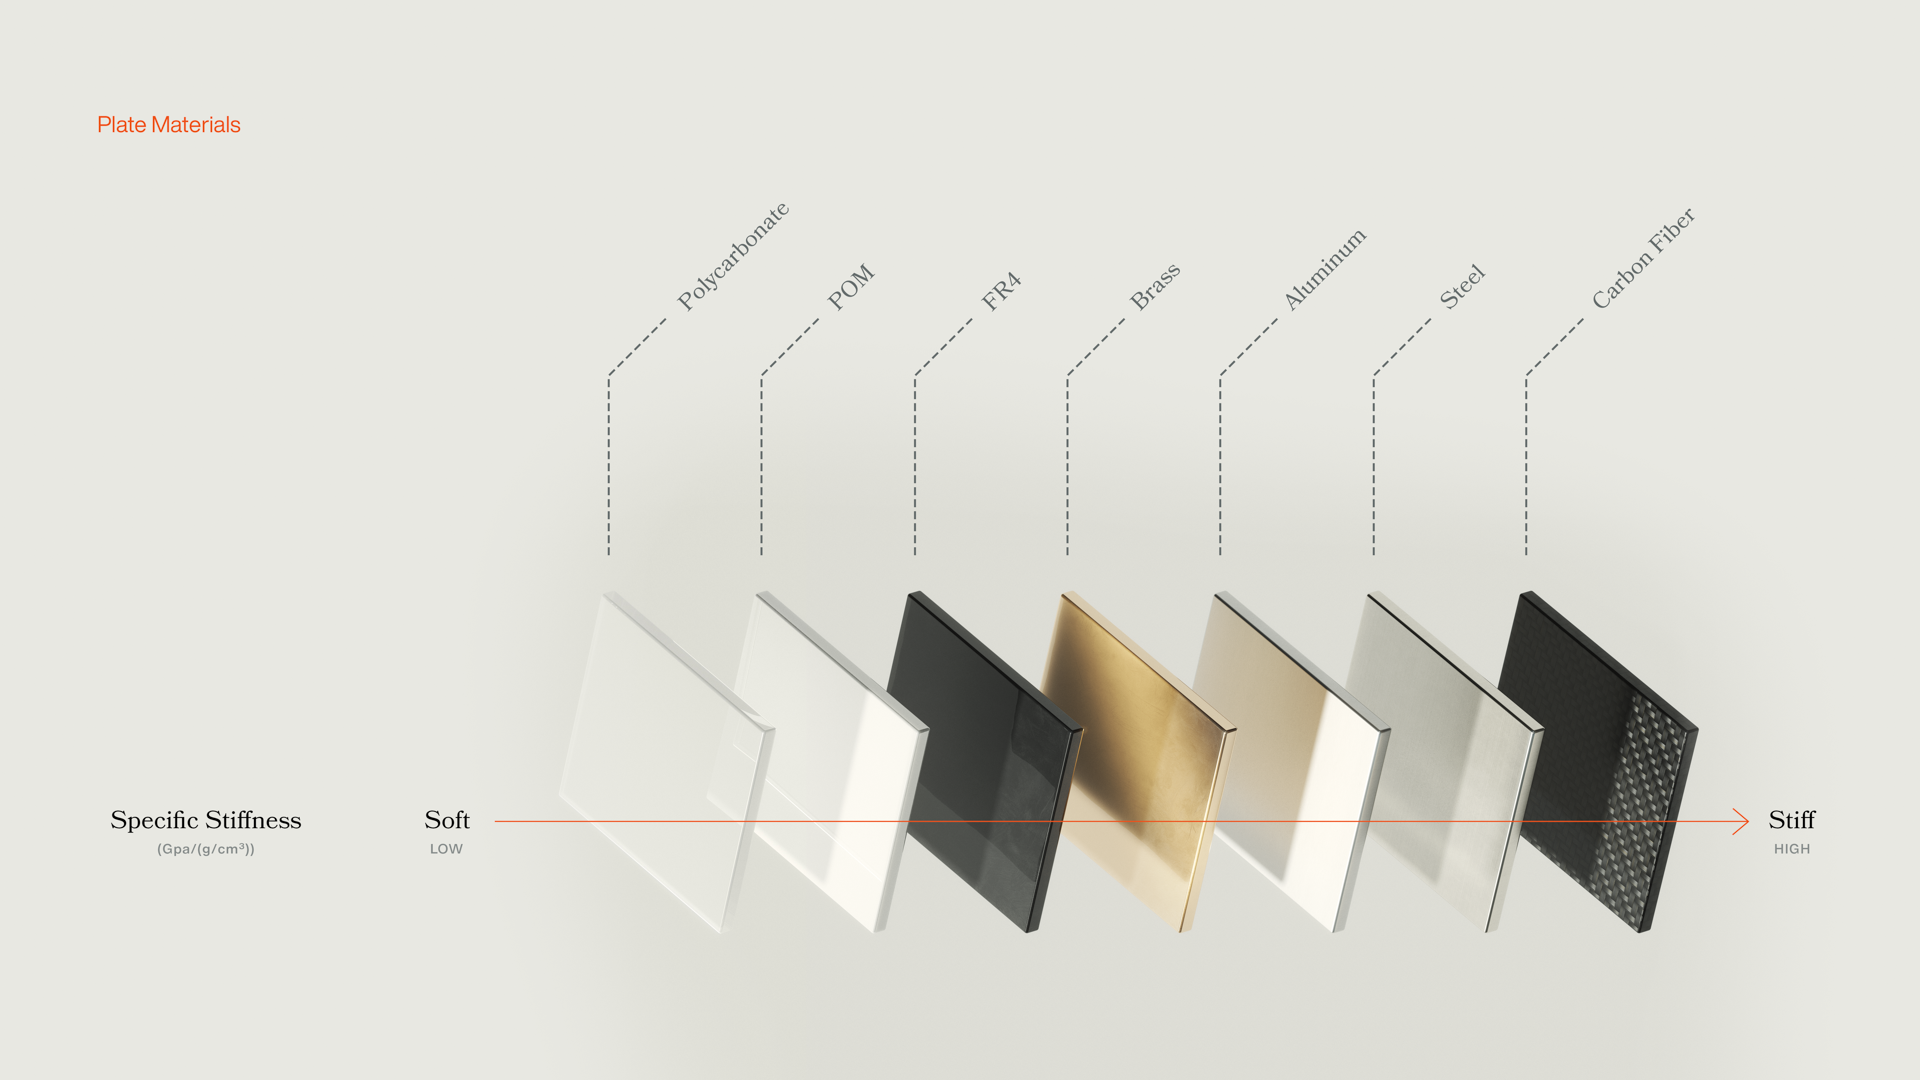
Common materials in order of their "specific Stiffness" rating. Render by Yuzu Studios.
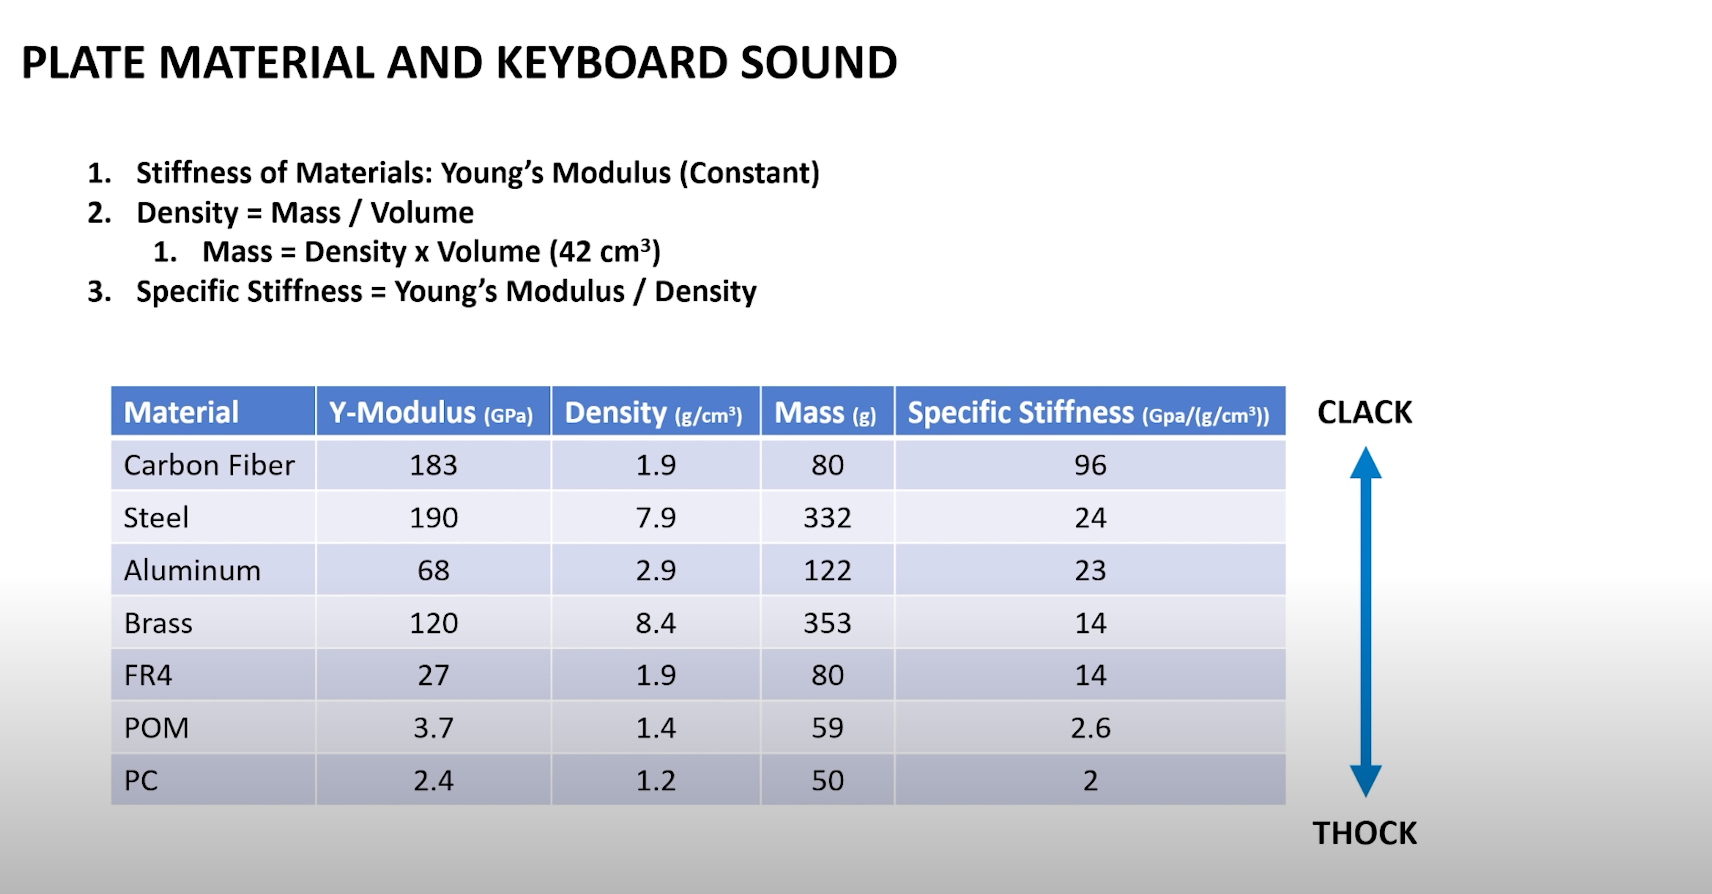
In this screenshot from Keybored's video, Scott goes into the science of how a material's calculated "Specific Stiffness" can impact how it sounds. Click on the image to watch the video excerpt.
Render by Yuzu Studios
Switches
The MX-style switches available on the market has exploded in recent years. With so many choices, it can take time to figure out what you like. This is why most people start their journey by purchasing a hot-swap keyboard to install and try different switches without having to solder easily. Some keyboard vendors offer switch sample packs and testers to help you try individual switches.
MX-style switches fall under three main categories: Linear, Tactile, and Clicky.
Click the plus + to expand the section below
-
Linear Switches are the smoothest switch types because there is no “bump” when pressed.
-
Tactile switches have a noticeable tactile “bump” to give you feedback when pressing the switch.
-
Clicky switches, like tactiles, have a noticeable “bump, “plus an additional “clicking” sound when pressed. These are very common in traditional gaming keyboards.
Stock, Factory-Lubricated, and Hand-Lubricated Switches
When purchasing switches, they often come factory-lubricated or un-lubricated (stock). Factory-lubed switches are ready to use out of the box, and as a beginner, this will be perfectly fine for you.
As you grow in this hobby, you’ll train your ears and fingers to hear and feel the differences of a well-lubricated switch. That’s where hand-lubrication and modification come in because they can improve the performance and sound of your switches.
Click the plus + to expand the section below
-
When purchasing switches, it’s a good idea to buy a little more than you need. Sometimes, a switch may arrive in poor condition, or you might accidentally break it.
If you are re-lubing switches that have come factory-lubricated, often you can lube over what’s existing. But if you want to start fresh, here is a video by JTTR on how to clean off factory lube before hand-lubing.
In this video, Taeha Types shares his process for hand-lubricating switches. Also, check out this 2022 guide from Alexotos.

Render by Yuzu Studios
Keycaps
Keycaps are the face of your keyboard and what drives the aesthetic of your build. Looks aside, keycaps can also impact the feel and sound of your keyboard. Like switches, they are a deep well to explore on their own.
Regarding feel, keycaps come in different height profiles, sculpted or uniform tops, and materials. All of which boils down to what feels comfortable for your hands and fingers to type on.
For sound, thicker and taller keycaps–like SA keycaps–tend to have a deep sound. In comparison, thinner keycaps with less volume tend to sound lighter.
Cherry-profile keycaps are seemingly the most popular because of their massive distribution in previous decades and medium-height profile, which many find comfortable. While there is a growing list of quality keycap makers, the de facto standard is GMK (Güntner, Meinhardt, and Kredler) keycaps, which are known for their excellent crisp legends and consistent production quality.
While Cherry profile and GMK keycaps are popular, this shouldn’t deter you from exploring other options that might be better suited for your comfort and style.
Click the plus + to expand the section below
Chasing that Elusive “Perfect” Sound
With the combination of the keyboard case, plate, switches, and keycaps, people in this hobby chase certain types of sound signatures. The most notable sounds are “Clacky” (high-pitched and loud) and “Thocky” (deep and muted). While the exact definitions of these sound signatures can be debated, here are a few examples of what they generally sound like.
Example of “Clacky” by Sam Pak
Example of “Thocky” sound by Near Lucid.
How to buy a Mechanical Keyboard
By now, you might be hyped and ready to spend some of your hard-earned dollars on a fancy rectangle. But purchasing a custom mechanical keyboard and all the components can be tricky and take time to fulfill. This might be one of the most challenging parts of the mechanical keyboard hobby in a world of instant everything and next-day shipping: buying one.
In the following video, Avi thoroughly explains where and how to buy your keyboard.
Three ways to Purchase
You would expect purchasing a custom mechanical keyboard would be straightforward, and sometimes it is. But because of costly low production runs, high demand, and limited supply, buying a mechanical keyboard can take time and money. As the hobby grows into a more significant industry, those growing pains will eventually work out. For now, there are three main ways to purchase your keyboard, keycaps, and parts:
In-stock & extras – Currently available and quickly fulfilled.
Group buys & Pre-orders – Typically purchasing ahead of the production run, and can take months to over a year to fulfill.
Aftermarket – Currently available, dealt on a one-to-one basis in forums, at typically higher than retail prices.
“Wait, how much?”
This is not a cheap hobby and is considered a luxury by most. If you want to dive into this hobby, know that you’ll need expendable income. There are a ton of budget options out there. But no one should be choosing between a new keyboard and paying rent. Spend responsibly.
“What should I expect to pay?”
Below is a range of what you might expect to pay for different keyboard components. There will always be examples of outliers to these examples, but this should help you understand what you might expect to pay at retail prices.
Click the plus + to expand the section below
-
The cost can vary from budget boards to high-end boards depending on who is designing it and what kind of materials are used. Generally, if it is a smaller, upcoming designer, the cost of the board will be higher because of material costs and a smaller manufacturing scale. Budget boards tend to use cost-effective materials and will usually have faster production times.
-
On the low-end, you’ll find many available budget-friendly options. The trade-off is usually lower quality legends (type and icons on the keycaps), thinner keycaps, and sometimes warping. In most cases, this will be “good enough.”
On the high-end, expect to pay over $100 for premium keycaps, like GMK. You may spend more than that if you buy additional kits (e.g., a Mac modifier kit or Novelties kit).
-
A majority of switches will live at 20-60 cents per switch. However, a growing pool of switches uses less common materials and tooling, which can drive up the price a little higher.
“What about the aftermarket?””
Because of the wait times of group buys, and limited runs for certain keyboards, prices tend to go up in the aftermarket. Sometimes they can be listed at 2x or more of the retail price, depending on the hype and rarity of the keyboard or keycap set.
“So what’s a good keyboard to buy?”
This hobby is based on personal preference. There aren’t any definitive rules for what makes something “good,” but rather, it’s up to you to find what’s “good” to you in terms of aesthetics, feel, and sound. At the end of the day, you’ll be the one using it.
As you spend more time (and money) on the keyboard hobby, you’ll develop your own distinct tastes and style with experience. The beautiful thing is, you can always change it up, whenever you want.
Having said all that, it’s generally recommended to get an entry-level keyboard to begin building and tinkering with before you make a huge investment. This way you can play with different plates, switches, and keycaps to discover your preferences.
Click the plus + to expand the section below.
-
Here is a list of readily available keyboards around $200 that are highly recommended by the community.
How to Build a Mechanical Keyboard
You’ve just bought a keyboard kit, switches, stabilizers, and keycaps. Now it’s time to build your keyboard.
In this video, Matthew shares the process of building a Mode Sonnet from start to end, and shares different ways of modifying it to your liking.

While some keyboard makers offer specific build guides, most generally follow this sequence:
Test PCB
Lubricate, tune, and install your stabilizers
Mount switches to the plate and PCB
(optional) Solder switches – skip if you have a hot-swap PCB
Test PCB with switches
Mount the PCB and plate into the case
Top off with keycaps
(optional) Remap your keys
Click the plus + to expand the section below.
-
Lubricant – There are different lubricants for different purposes, which are noted below
You can also purchase an entire kit.
Note: some of these tools might come with your keyboard kit. Double check your product information.
-
Soldering Kit (if you plan on soldering your keyboard)
Stem holder
Step 1: Test the PCB
The first thing you should do is test your PCB. You want to make sure everything functions correctly before you spend the time to build everything, so you won’t have to take it apart later.
To do that, you will take your PCB and connect it to your computer. If your keyboard uses a daughterboard, connect it to your PCB with the JST connector, and plug that into your computer via USB.
Next, you’ll open up a key testing software, like VIA, and test that each key works by using a pair of metal tweezers to make contact with the sockets. One tip to make this easier is to flip the PCB over and make contact with the back, as the conductive area is easier to access.
If something isn’t working, you can reach back out to the manufacturer for a replacement.
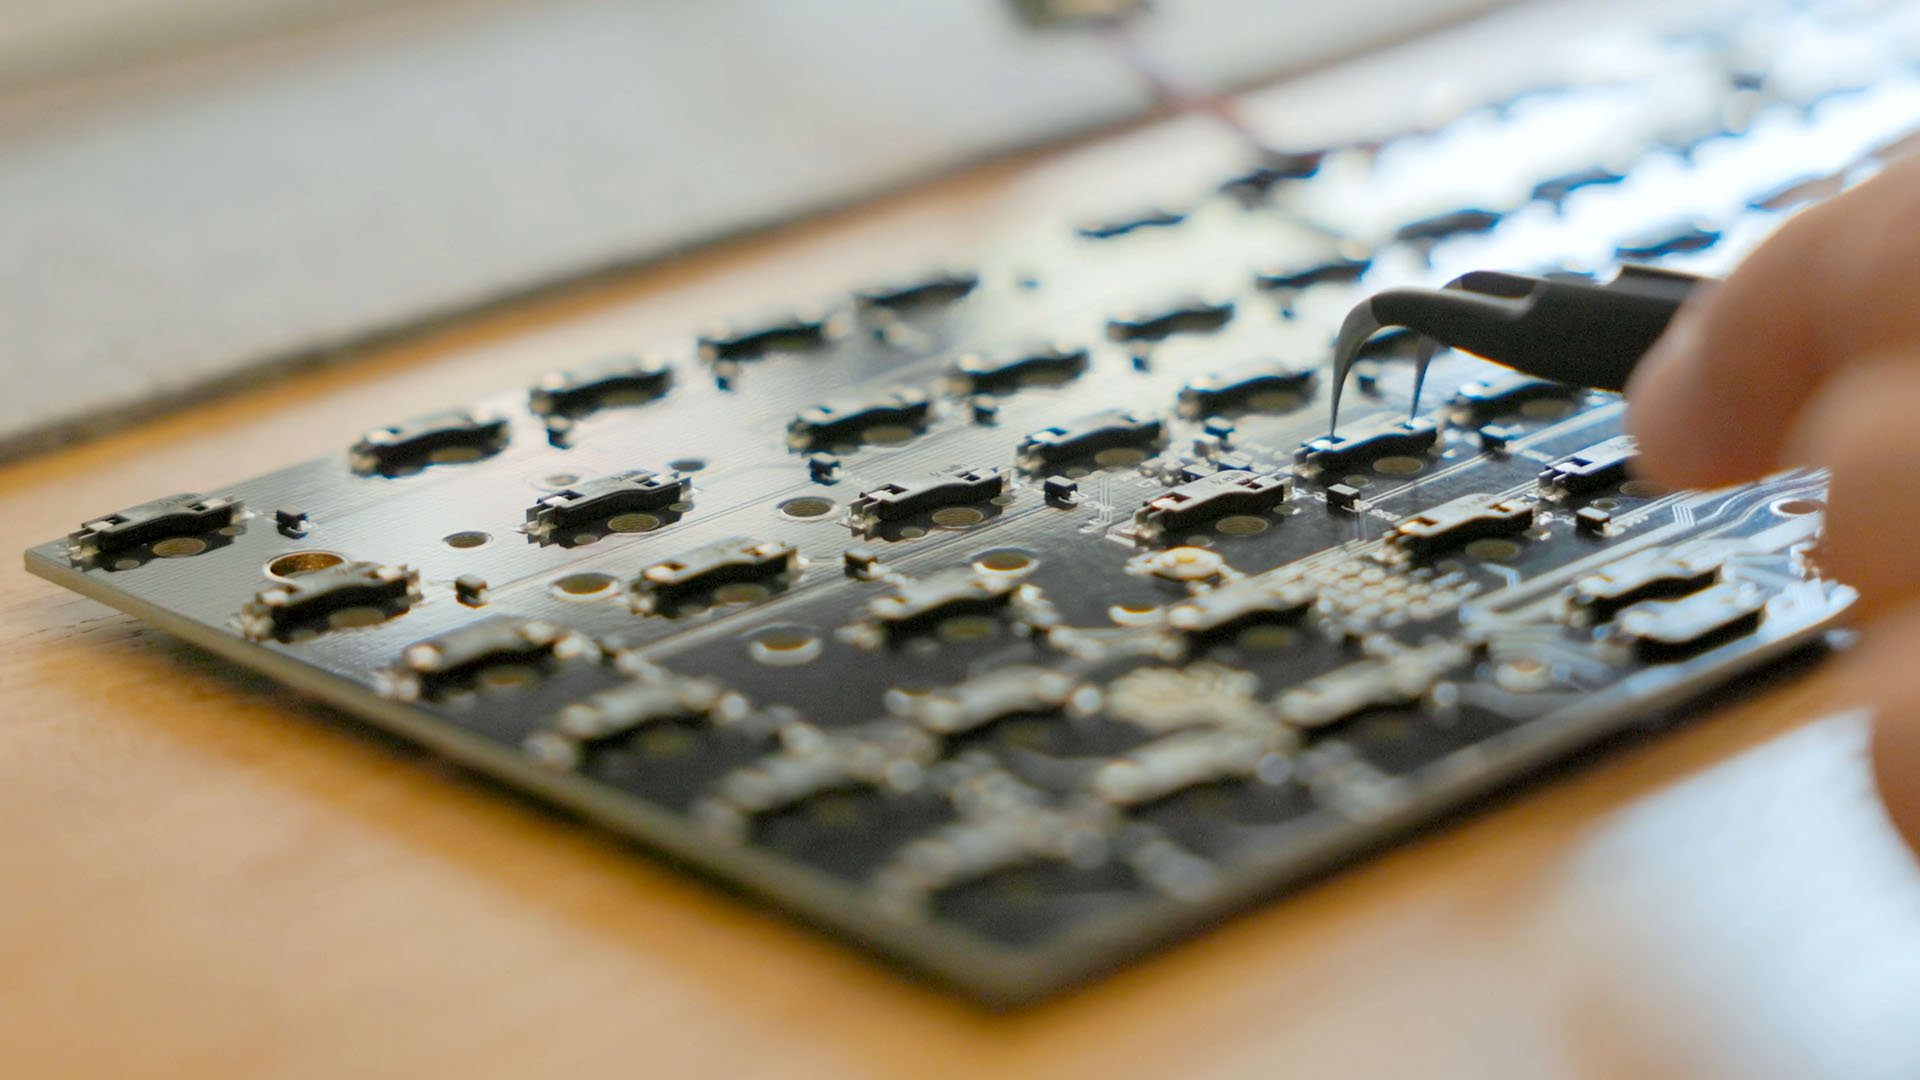
Watch this helpful video by Alexotos to learn about the process in depth.
Step 2: Lube, tune, and install stabilizers
Next, we’ll need to assemble and lubricate our stabilizers, which are essential for keeping our long keys like the spacebar balanced and supported when pressed. Your stabilizers (“stabs” for short) do not come lubricated and tuned most of the time.
The goal here is to have your stabilizers tuned to the point where they don’t rattle for smooth operation and sound.
Click the plus + to expand the section below.
-
Things to consider when shopping for stabilizers are:
PCB-mounted vs Plate mounted. Most custom-built keyboards use PCB mounted stabilizers.
Screw-in vs clip-in stabilizer. Both work, but some would argue that screw in stabilizers are more secure and rattle less, because the screw and washers provide a tighter fit.
PCB thickness. Most PCBs are 1.6mm thick, though some manufacturers go thinner. In those cases, you may need to seek out 1.2mm stabilizers. Usually the maker will make note if they’ve opted for a thinner PCB.
-
Krytox 205g0 - If you can only buy one lubricant, get this, which can be used to lubricate your switches and stabilizers.
Krytox XHT-BDZ - If you can spare the extra funds, it’s worth additionally getting either one of these lubricants, specifically for your stabilizer wires, as it lasts longer than 205g0
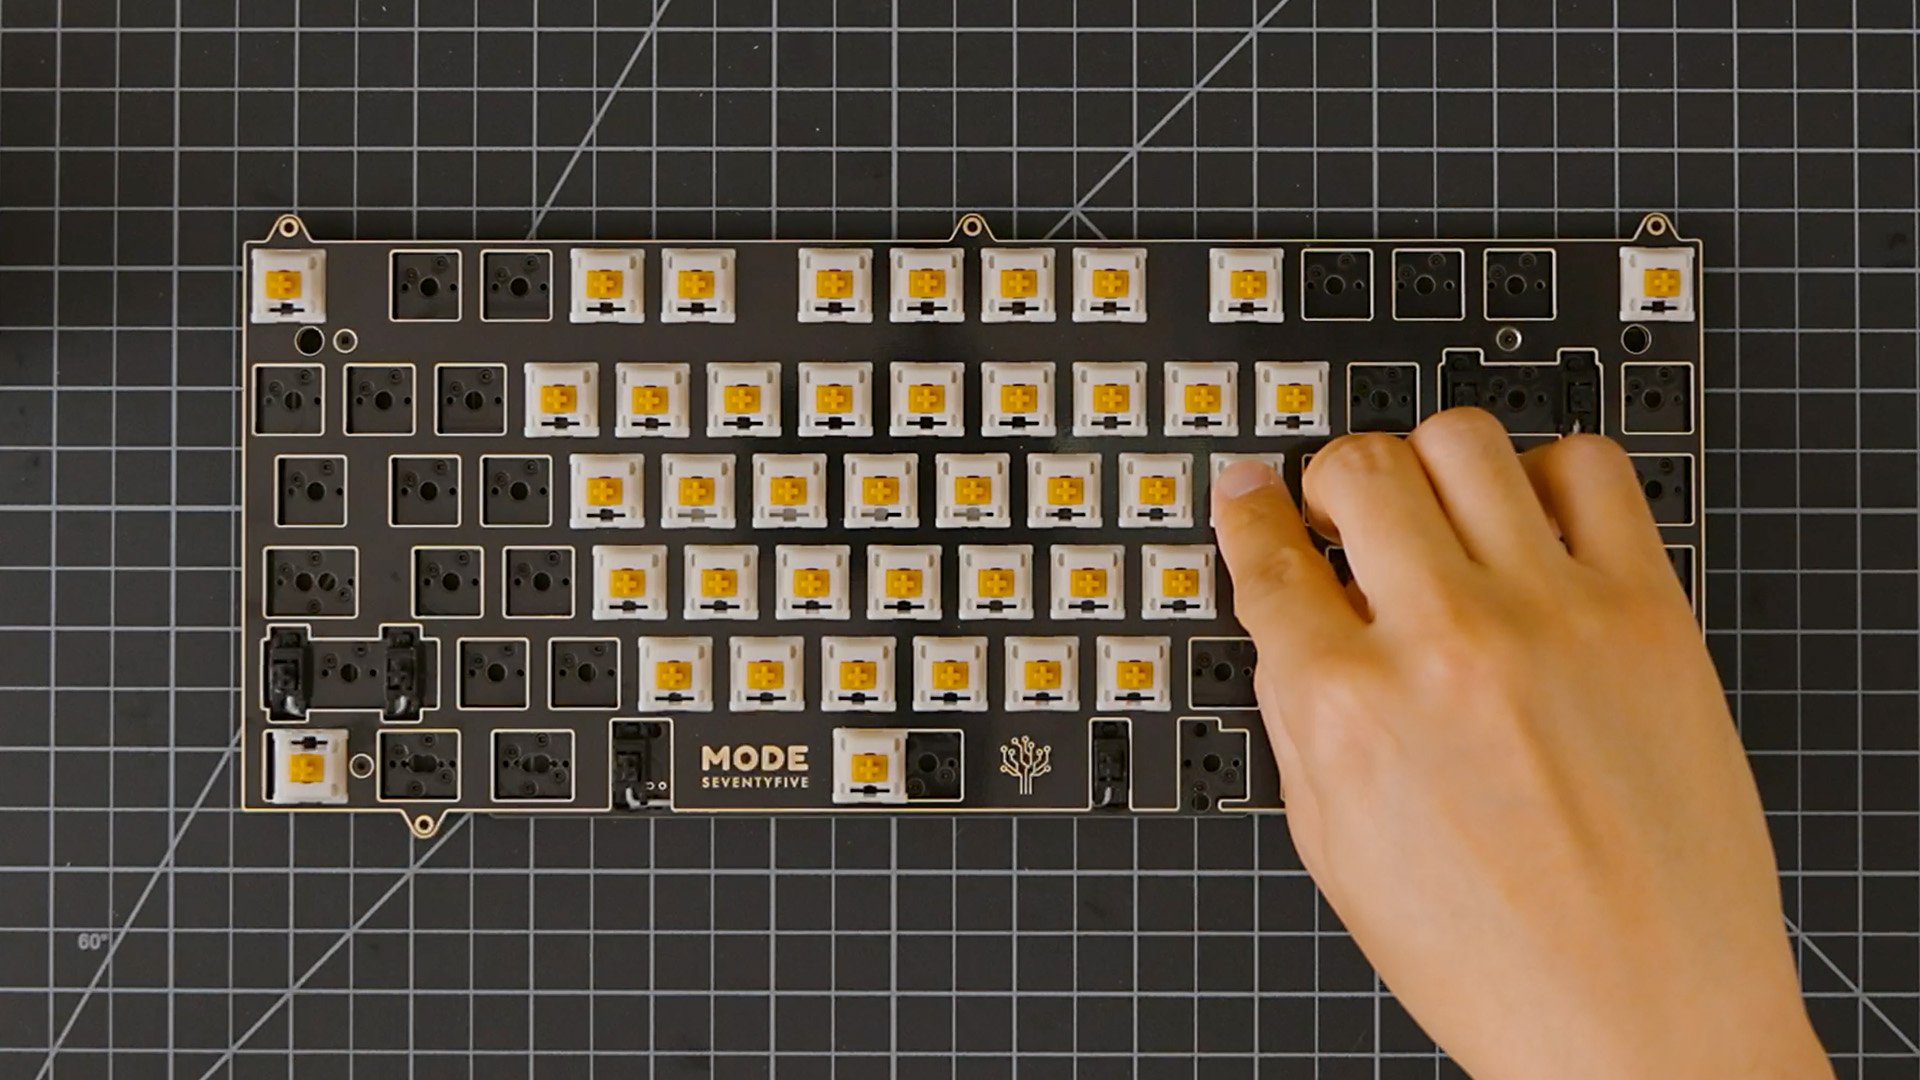
Step 3: Mount switches to the plate and PCB
Next, grab your plate, and align it to the corresponding keys on your PCB. The most recognizable slots on the plate are typically the spacebar, enter, and backspace keys. Sometimes the PCB has standoffs for you to screw your plate onto it. Do that before proceeding.
Now we can begin to install our switches. Watch this video from Switch and Click to learn more about switch orientation, installation, and removal.
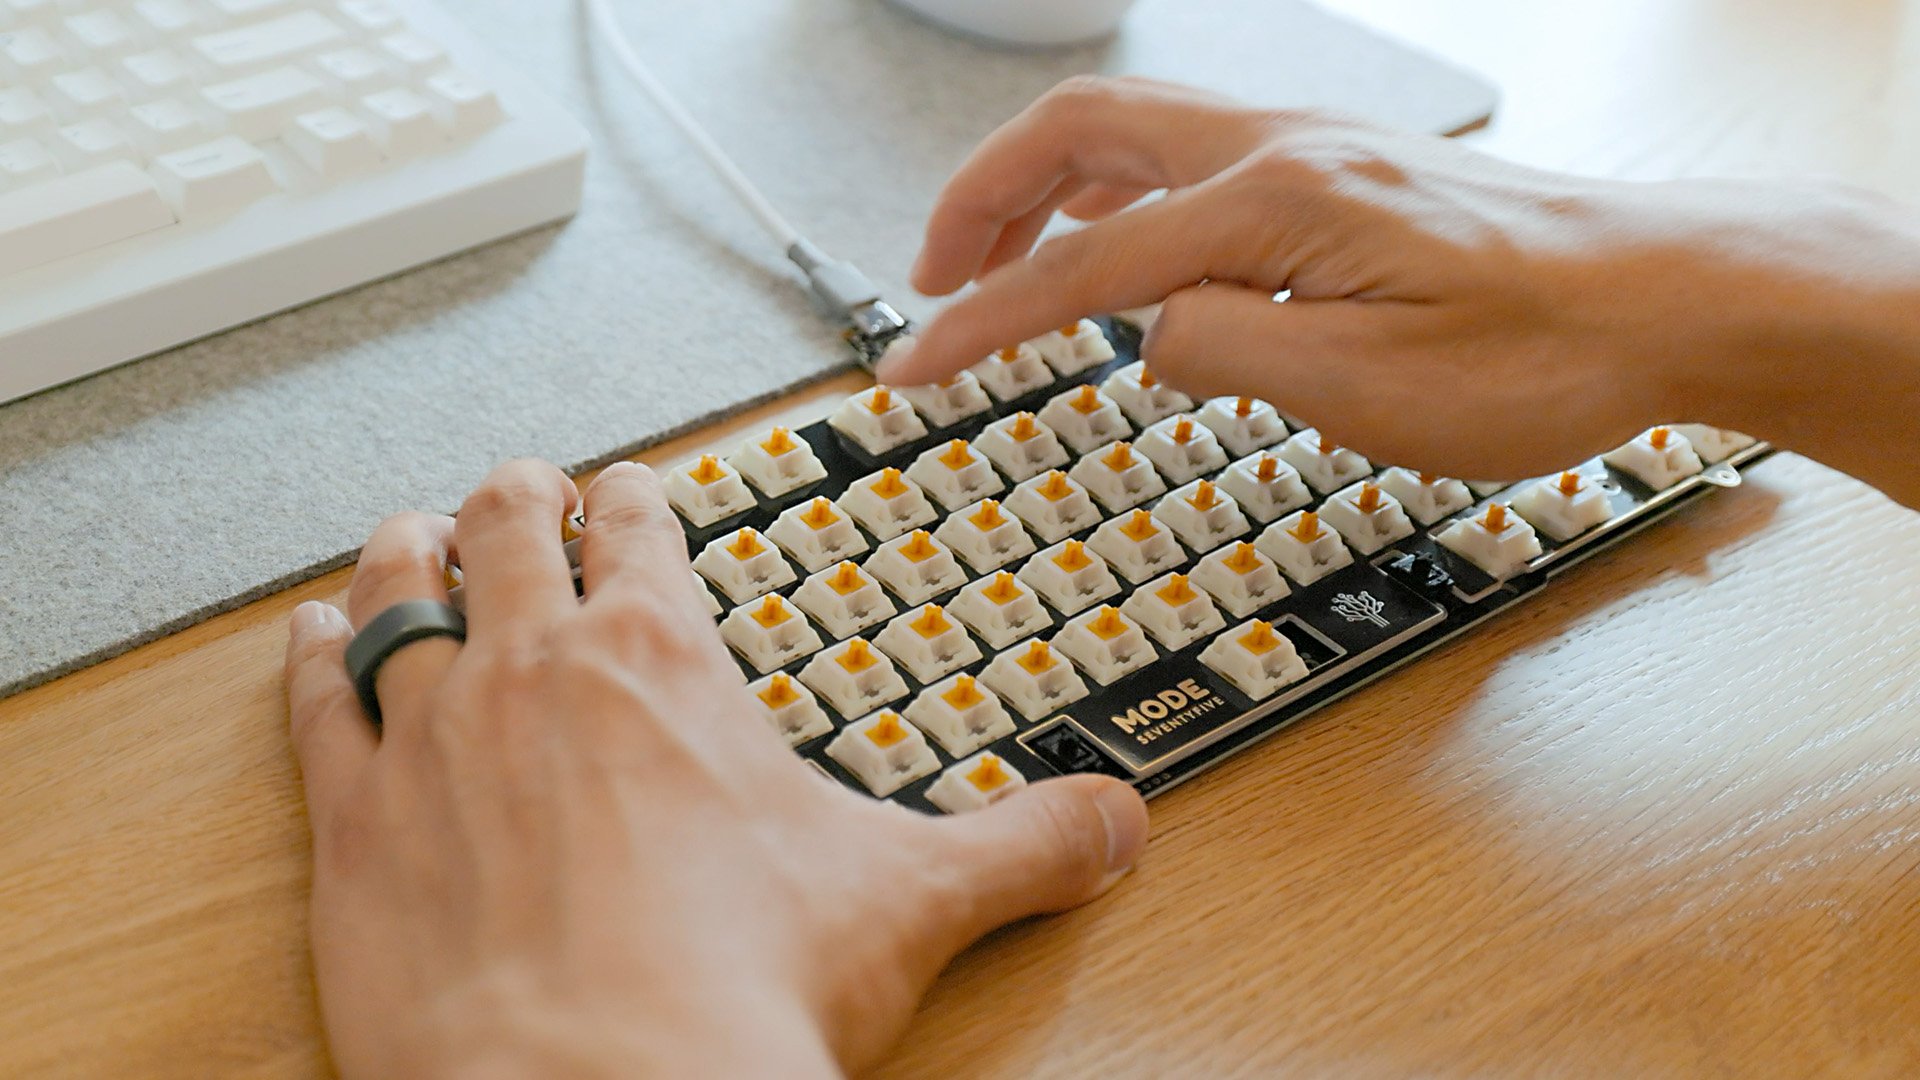
When installing switches, start in the corners to help align and hold the plate and PCB together. Then work your way from the middle out. This order is beneficial when working with softer plate materials or PCBs without screw standoffs.
Make sure that the switches are correctly seated on the plate, with the switch pins going into the hot-swap sockets on the PCB with no bent pins. If you happen to have a bent switch, you need to take tweezers or pliers and straighten the switch pin, and it should install correctly.
Click the plus + to expand the section below.
-
Before installing any switch, make sure the pins are straight to go into the socket properly. If they’re bent, use tweezers to straighten them out.
Make sure you brace the back of the PCB and firmly press the switch straight and evenly. So they clip into the plate.
If your plate starts sagging, you can always pull up the edges to make sure the plate and PCB are parallel.
You’ll notice on some PCBs that a few keys have options of facing north or south. These are the other supported layouts of the board, like a longer 7u spacebar or a shorter 6.25u spacebar.
Watch this tutorial by Brandon Taylor, to learn about soldering switches to your PCB.
Step 4 (optional): Soldering switches
If you didn’t buy a hot-swap PCB, you’d need to take an extra step to solder your switches. Soldering is the traditional way to install switches to a keyboard, which joins the pins to the PCB, allowing it to make electrical contact through the solder.
Soldering is semi-permanent and requires desoldering. If you want ever want to change out the switches.
-
Solder Iron – Pinecil
Stand – Noah Premium Soldering Iron Holder
Solder - Kester
Fume Extractor – KOTTO
Step 5: Test the PCB with the switches
At this point, it’s a good moment to test all of your keys once more through your key-testing software, this time pressing your switches. You might find that one of your switches might not be triggering. In that case, we’ll use our switch puller and take it out of the socket.
Usually, the problem is the pin didn’t go in correctly, and you might have to straighten it out if it got bent on the way in.
Step 6: Mount the PCB and plate into the keyboard case
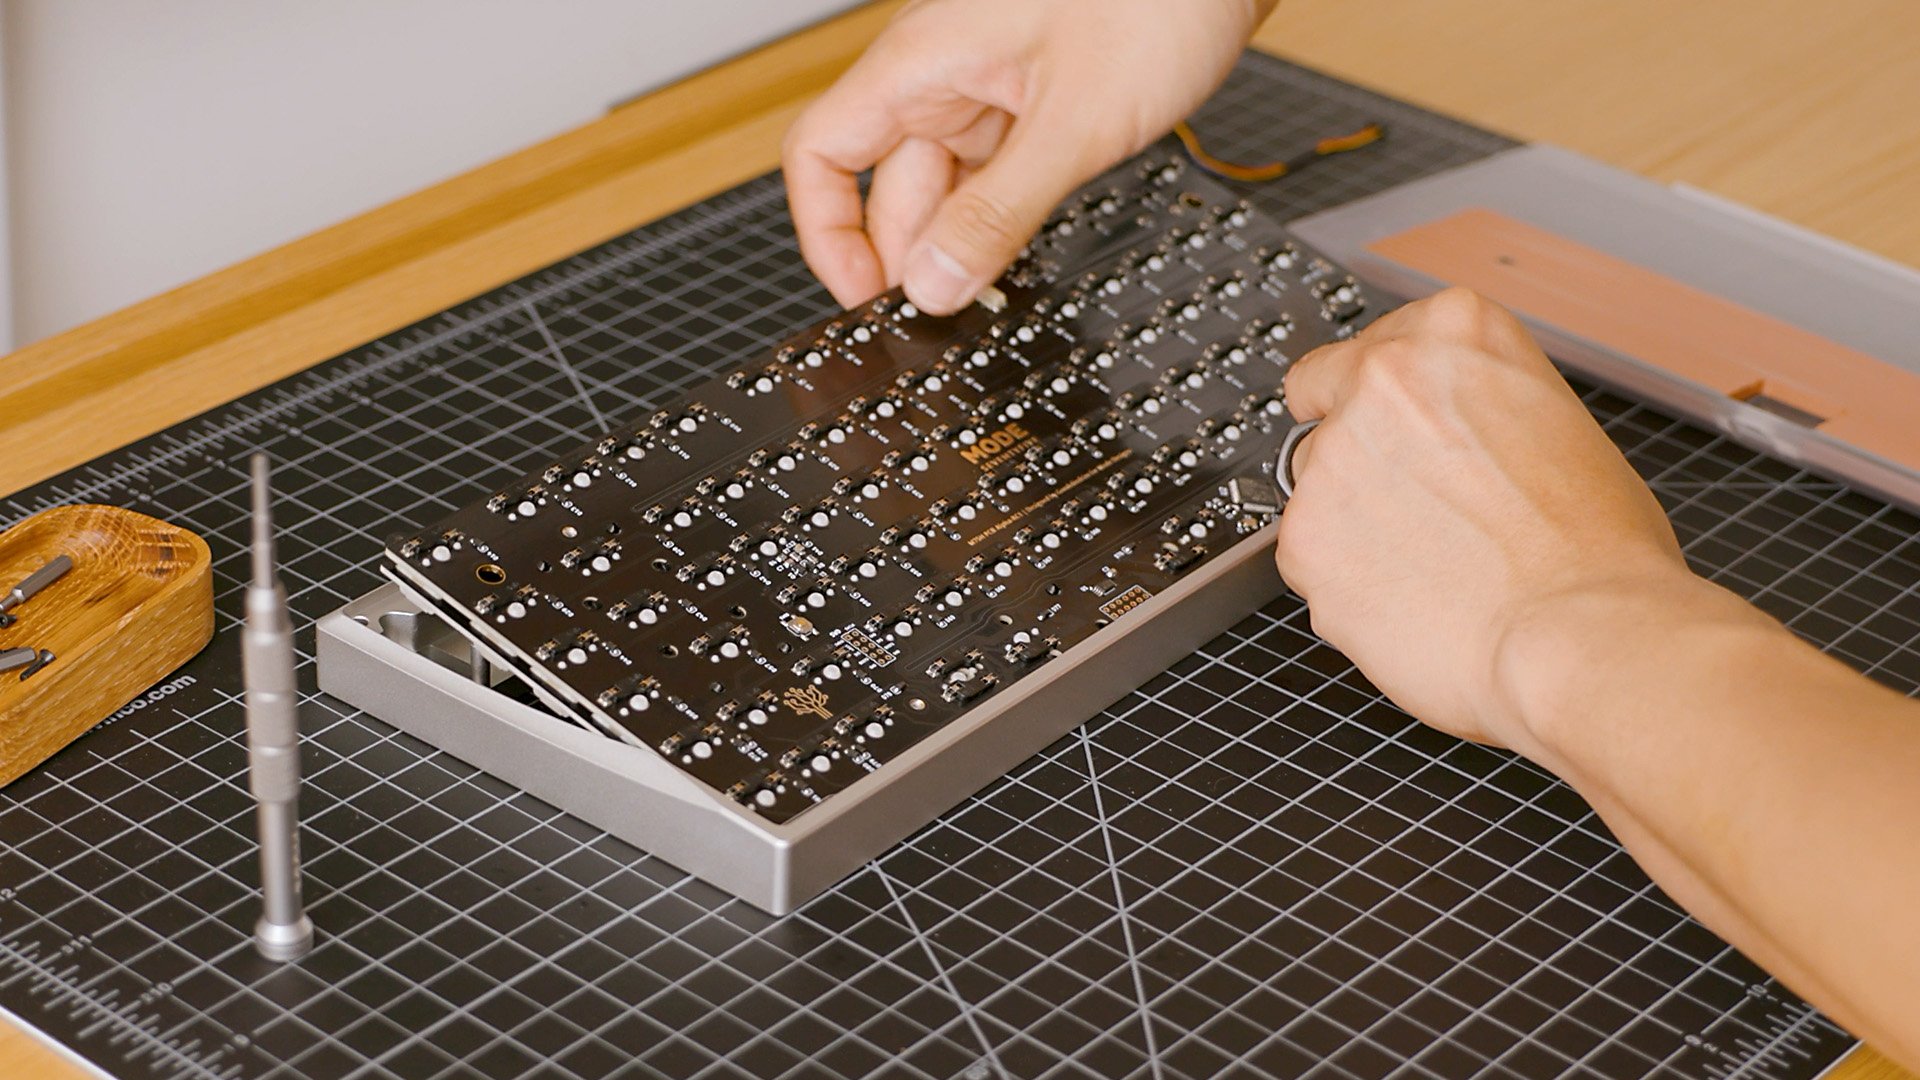
With everything working correctly, you will now mount the PCB and plate to your case. As we reviewed earlier, each keyboard has its mounting style, so refer to its provided information.
Usually, keyboards utilize protective rubber or silicone feet on the base to protect them from scratching or sliding. Install those next.
If your PCB uses a daughterboard, you’ll want to fasten that to the case now and connect them with your JST cable, ensuring the holes line up with the pins inside the JST housing.
Step 7: Top off with keycaps
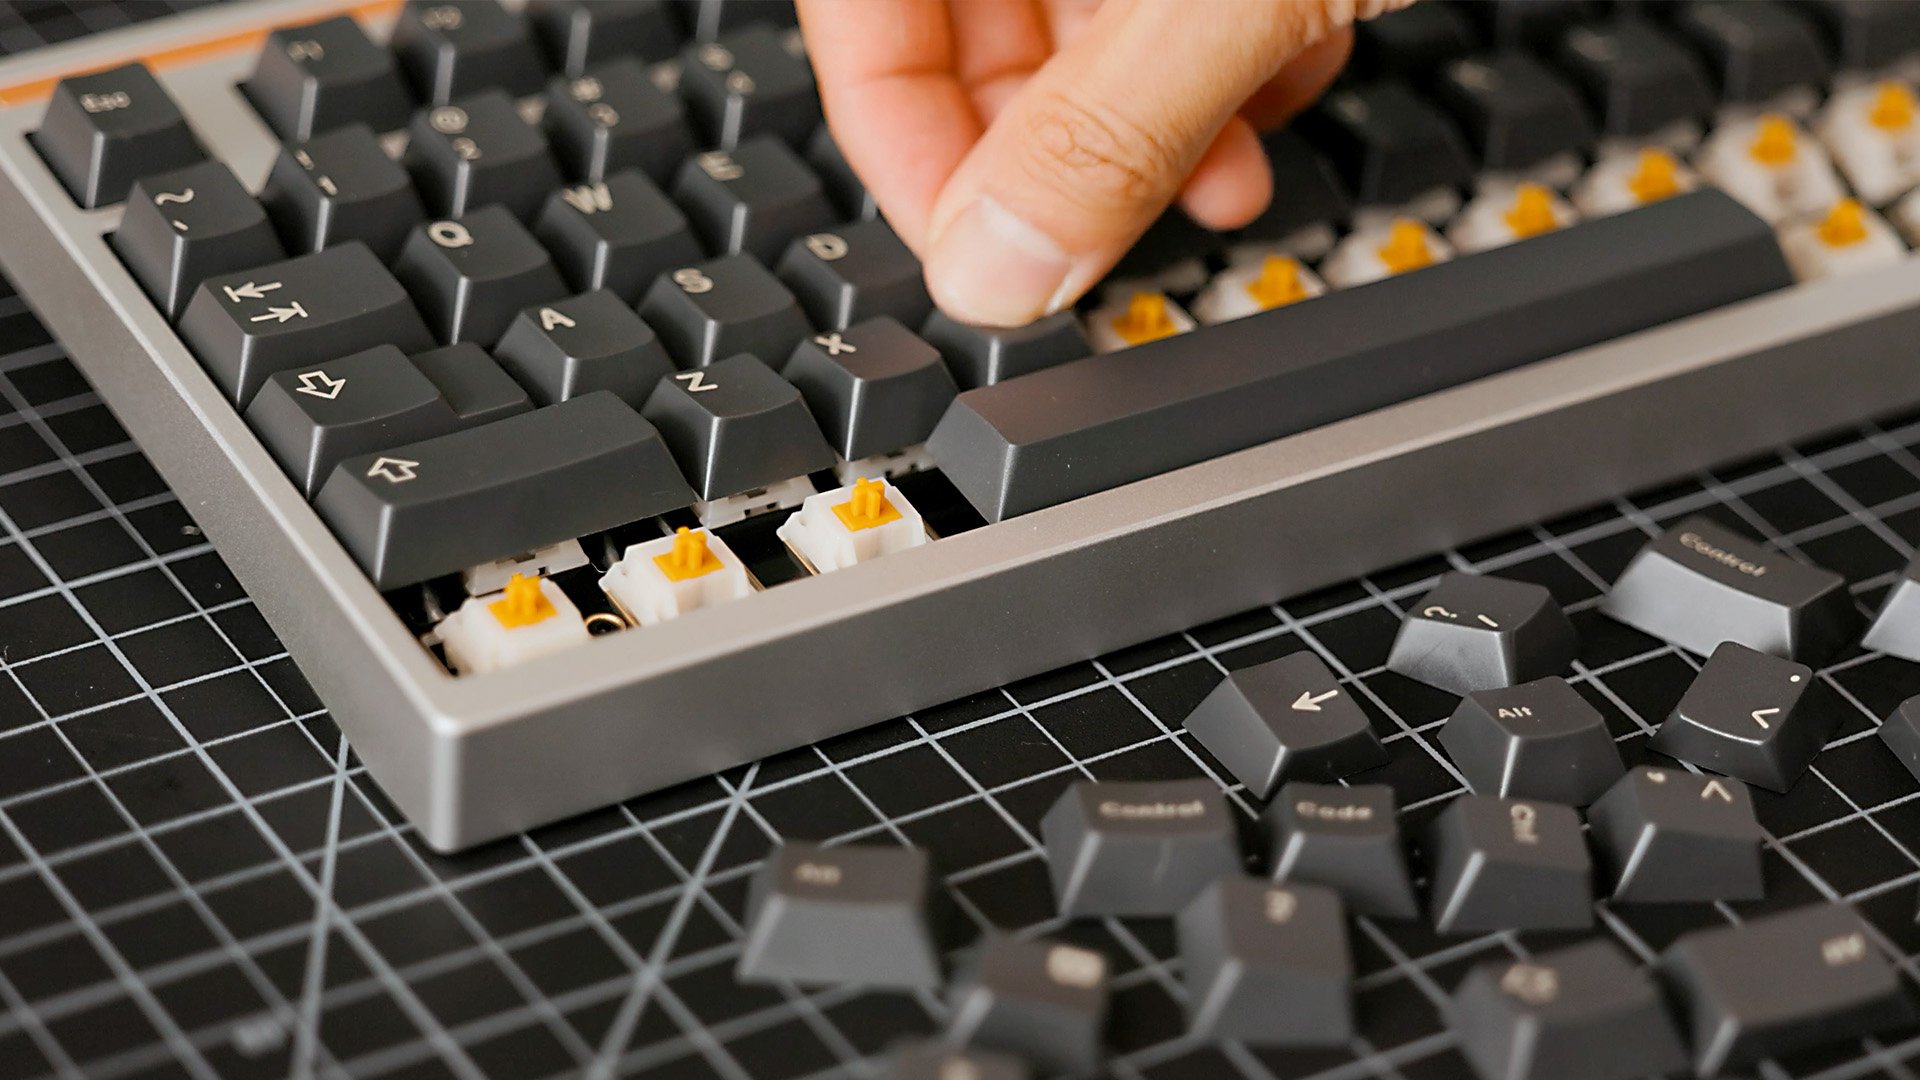
The last step of assembly is to add our keycaps, the face of your keyboard. This process should be straightforward. You’ll want to mount your keycaps onto the stems on top of your switches.
As we learned earlier, some keycaps are designed so that each row has a different angle for better typing comfort. Because these keycap sets are designed to fit a variety of keyboard layouts, you may see duplicates of some keys with different heights and angles.
You can always check by looking at the profile of how your keycaps sit on your board. If you accidentally put in the wrong height keycap, you can use your keycap puller to take it out and replace it.
Watch this tutorial to learn how to reprogram your PCB using VIA.
Step 8 (optional): Remap your keys
This last step is optional: if you’re a mac user or want to alter your keymap layout, you can plug in your keyboard, load up VIA (or a compatible remapping tool), and remap the keys to your liking. You can also program your layers if you’re using a compact keyboard and create macros if you like to utilize shortcuts.
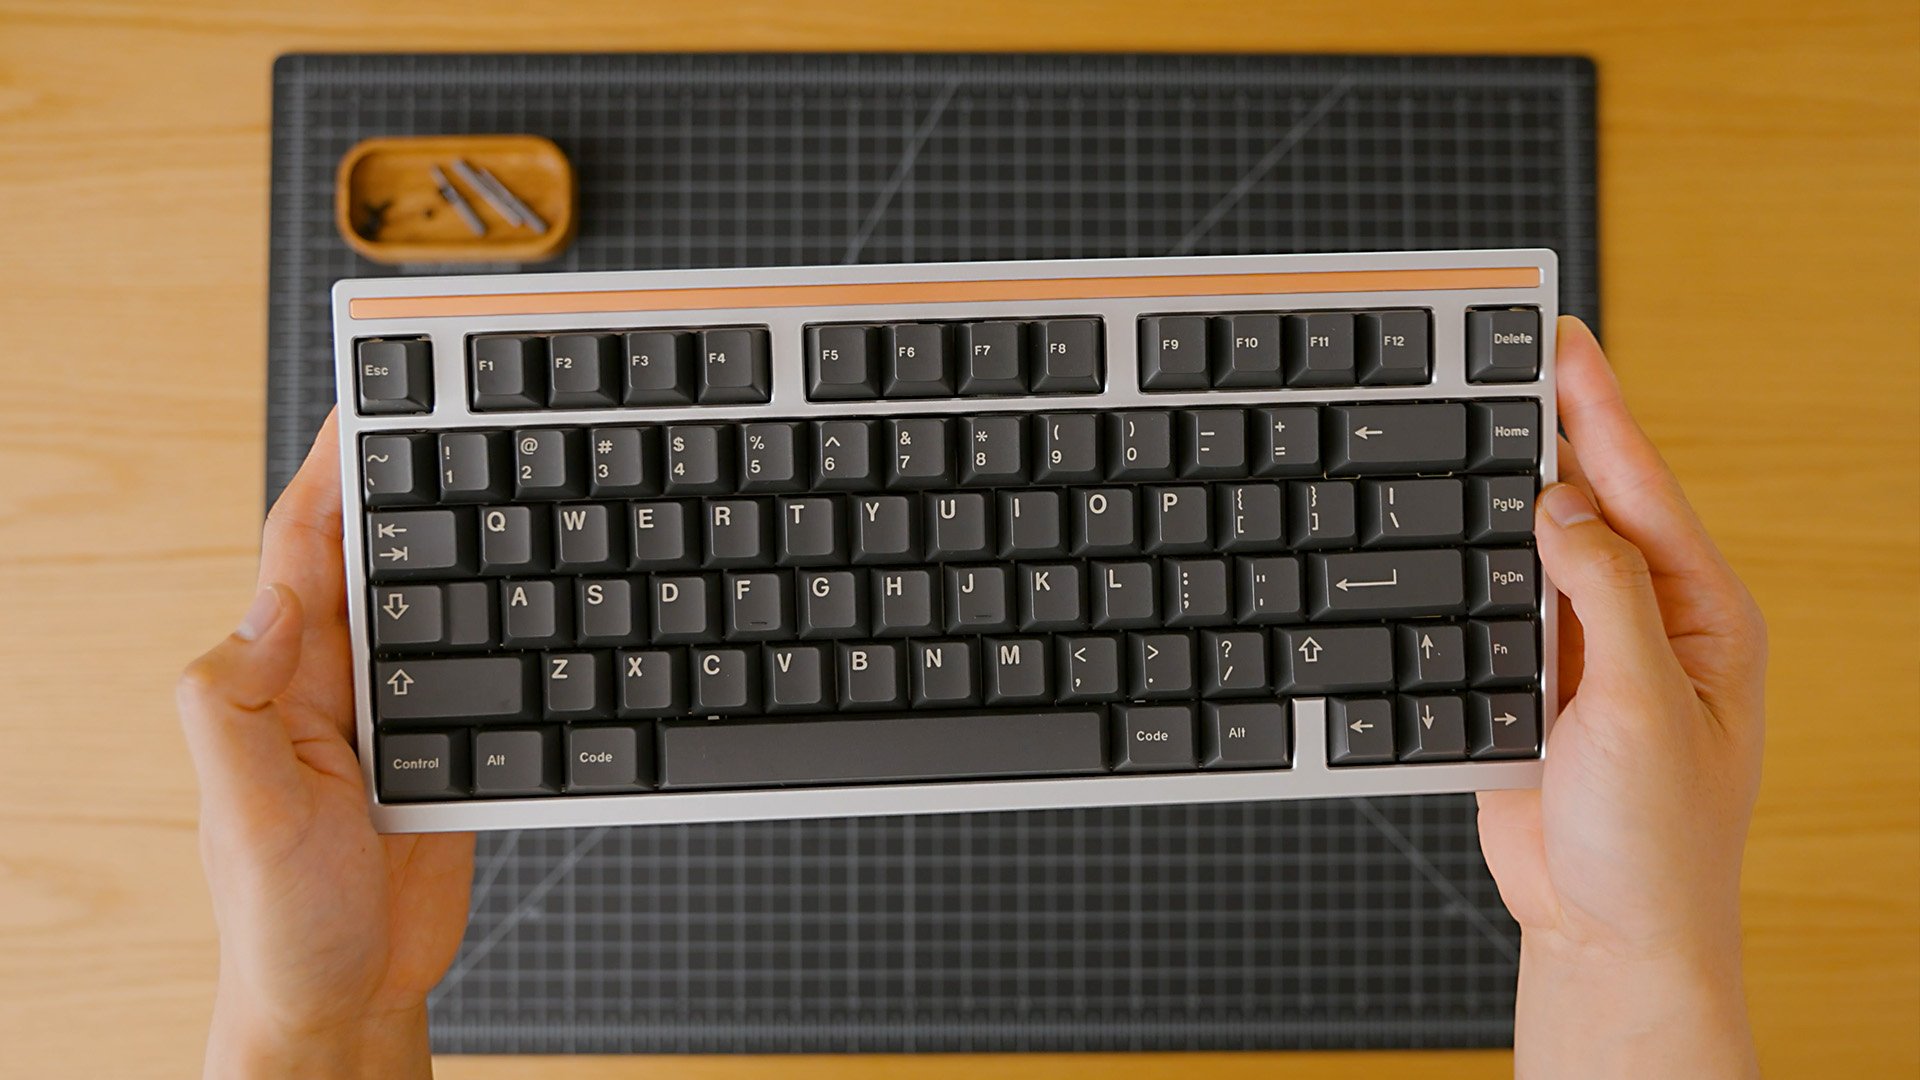
Complete!
Plugin your keyboard, and christen your build with an inaugural typing test on monkeytype.com.
“What’s next?”
Congratulations, you’ve just built your first keyboard. If this process opened up the rabbit hole for you, and you want to go even deeper:
Discuss. Join the Discord servers of keyboard designers and content creators. Share your build, check out others, and ask questions. You’ll get the most up-to-date information about upcoming projects and insights into limited boards that you might be interested in.
Learn. Tune into keyboard streamers on Twitch, where you can watch keyboards get built. They’re usually open to questions about the process, preferences, or advice.
Explore. Test out more switches and try out other different plate options to hone in and find your favorite sound and feel.
Meetup. There are likely other enthusiasts in your area which may host meetups (see Resources). This allows you to share your build and try out others. This will help you discover your preferences, and share the joys of this wonderful hobby with fellow enthusiasts.
You’ll find helpful links in the Resources section at the bottom of this guide.
The possibilities in this hobby are endless. Chasing that “perfect” sound and feel can keep you engaged for a long time. Just remember one thing... there is no end game.
Hear from the Community
We’ve interviewed various voices from the keyboard enthusiast community to get a range of perspectives. From designers to content creators, you can hear their advice to get started and learn about their favorite keyboards and accessories. Scroll left and right to see more.
-
![]()
Taeha types
Advice to the community: Don’t give in to FOMO (Fear of Missing Out)
Current favorite keyboard: Realforice R2
Current favorite switches: Topre
Current favorite keycaps: GMK WoB
-
![]()
XXW
Advice to the community: Watching streams/YouTube videos are a good resource but the hobby is mostly about preference, so don't be afraid to try out different things on your own. Also, be prepared to wait for certain products and understand that this hobby can be expensive.
Current favorite keyboard: Bear65 by Jacky Labs
Current favorite switch: Fierce Girls and Pinokos
Current favorite keycap set: GMK Botanical
-
![]()
Alexotos
Advice to the community: Spend your money wisely! There is always a new keyboard and financial responsibility is so important.
Current favorite keyboard: Moontower v2 - 100%
Current favorite switch: KTT Roses
Current favorite keycaps: I do love GMK keycaps despite wait times
-
![Nainaigogo]()
Nainaigogo
Advice to community: I really recommend commissioning a custom one-off if you have the funds! It’s really fun designing your own board, and it’s more personal to you.
Current favorite keyboard: My custom one-off Type-XG
Current favorite switch: Topre or BSUN BCPs
Current favorite caps: Urushi caps
-
![]()
maxvoltar
Advice to the community: Be welcoming. It's that simple. The more people join the hobby, the more fun projects we can realize.
Current favorite keyboard: Geon F1-8X 722
Current favorite switch: Trash switches (HaiMu)
Current favorite keycaps: GMK Minimal
-
![]()
CookieCurls
Advice to the community: Be patient. The hobby has so much to offer, but it takes a lot of time to find the keyboard/keycaps that are perfect for you, and then waiting for that ship date 😭
Current favorite keyboard: TGR Jane V2 CE
Current favorite switch: Retooled Blacks or BCPs
Current favorite keycaps: GMK Olivia
-
![]()
Glarses
Advice to the community: Be patient. No keyboard is worth $3000
Current favorite keyboard: F1-8X
Current favorite switch: Too many to choose from
Current favorite keycaps: GMK Oblivion Hagoromo
-
![]()
Marcia (Apiary)
Advice to the community: Figure out your preference, then invest! Nothing wrong with buying a cheap aftermarket Hotswap board to figure out what you like before dropping big bucks!
Current favorite keyboard: Piggy 60
Current favorite switch: Raeds, Lavendars
Current favorite keycap set: GMK Noire 🙂
-
![]()
MakerMods
Advice to the community: BUY ONCE CRY ONCE... But a wise man buys 100 times and runs out of tears. But seriously, buy switches used but unlubed because you can save a lot of money if you're patient.
Current favorite keyboard: Mr. Suit with Zakus on PC plate
Current favorite switch: none can compare to the cherry mx red... or anubis tactiles, infinity key cow for linears
Current favorite keycap set: GMK 9009, honeywell, dolch
-
![]()
Sampakpak
Advice to the community: Prioritize sound and feel rather than how expensive the keyboard is. Just because they are expensive boards, doesn’t mean they feel or sound good.
Current favorite keyboard: F1-8X with leaf alu
Current favorite switches: BCP (Black Cherry Pies)
Current favorite keycaps: GMK Botanical
-
![]()
Eura.psd
Advice to the community: Don’t let other people tell you what to like and what not to like, especially if they’re mean about it. Preference is preference!!
Current favorite keyboard: Salvation & mc65 by perry
Current favorite switch: “McSwitches” (I made these for my Mc65): Gateron ink housings (I used red) with gateron yellow stems, 65g to long springs, lubed with 205g0 and filmed with deskey films
Current favorite keycap set: Epbt cool kids and GMK Serika
-
![]()
Matthew Encina
Advice to Community: Hand lubricate your switches (or have someone do it for you). It makes a huge difference, and can be a meditative process.
Current Favorite Keyboard: F1-8X by GeonWorks
Current Favorite Switch: MODE Obscuras (spring swaped with Sprit multi-stage 60g MO)
Current Favorite Keycap Set: GMK Boneyard
-
![Winardi (Win)]()
Winardi (Win)
Advice to the community: Make a little effort by doing some research about the hobby. Always prioritize buying or building a keyboard that's within your needs (work, gaming, etc.), aesthetics & preferences (layouts, sound profile), and budget.
Current favorite keyboard: Typ60 SL by axiom.kb
Current favorite switch: Sarokeys x Geon BCP
Current favorite keycaps: GMK Momo Yume
-
![]()
Keybored
Advice to the community: Take it slow, don't spend too much right off the bat because what you think you'll like might not be what you actually like after trying a few different things.
Current favorite keyboard: Always thought the LZ SE was one of the nicest boards from back in the day
Current favorite switch: Gateron Oil Kings
Current favorite keycap set: GMK WoB
-
![Xueer]()
Xueer
Advice to the community: Don't hesitate to attend keyboard meet-ups, you can always bring a friend if you're nervous! They're a great opportunity to meet fellow enthusiasts and explore different keyboards, helping you discover your preferences without having to commit first 🙂
Current favorite keyboard: SingaKBD Unikorn R2.2 (for the sound profile) and Helheim DesignsFreja65 (for the aesthetic)
Current favorite switch: Gateron SolDark
Current favorite keycaps: GMK Panels
-
![]()
NinjaPirate9901
Advice to the community: Always go winkeyless when possible. It makes you type faster and a better person.
Current favorite keyboard: Unikorn or Matrix 2.0add
Current favorite switch: Epsilon Switches
Current favorite keycap set: GMK Phantom
-
![]()
Lulzthax
Advice to the community: Don’t be afraid to rebuild a keyboard with different plates and switches if you don’t love how it feels the first time
Current favorite keyboard: JJW Derivative If it can’t be kaze ;)
Current favorite switch: Cherry Blacks
Current favorite keycaps: GMK Botanical
-
![]()
Kate
Advice to the community: Buy in stock products or pre-own products so that you can get a feel for what you like rather than waiting on longer orders that take a long time to deliver. Because by the time they arrive your preferences might have changed.
Current favorite keyboard: Hibi June
Current favorite switch: Currently liking boba u4 silents
Current favorite keycaps: Olivia dark
-
![]()
Tristan Green / Captain Sterling
Advice to the community: Do loads of research to try to find what you would like. There is tons of information so take your time, don’t rush in because it’s very expensive. Please take care of yourself and be responsible with your finances.
Current favorite keyboard: My favorite board is a tie between the wind X and Owlabs Spring currently!
Current favorite switch: Ooooh so tough because there are so many options. Linear- WS Onion or Marshmallows | Tactile- Cotton candies or Salmons
Current favorite keycaps: Nekoccino 🐈 ☕️ or GMK Dracula
-
![]()
hipyotech
Advice to the community: I would say any newcomer should spend some time doing their own research to not get swept up in marketing hype.
Current favorite keyboard: It's hard to say any favorite keyboard and switch as they change a lot
Current favorite switch: I recently got into electrocapacitive switches and enjoy them a lot!
Current favorite keycaps: Polycaps Hippo
-
![iamELVN]()
iamELVN
Advice to the community: Do your research, be patient with the process of the keyboard because you can’t rush perfection.
Current fav keyboard: Typ60
Current fav switch: KTECH S2v2
Current fav keycap: GMK Dualshot
-
![Kimlynnwin]()
Kimlynnwin
Advice to the community: Learn as much as you can and ask all the questions. There is so much to customizing your own keyboard, like a hundred different ways to mod a keyboard. So try to see if there are any local meetups in your area so you can type on different builds and form your own opinion. Take your time with exploring different options, there is plenty of stuff coming in this hobby.
Current favorite keyboard: Amano R2 - PC
Current favorite switch: Dukharo Greens (tactile), and Popus (linear)
Current favorite keycaps: GMK Hazakura
-
![]()
TimKeyless
Advice to the community: Don’t go broke over keyboards. It’s not worth it
Current favorite keyboard: F1-8X plateless
Current favorite switch: Ultraglide browns
Current favorite keycaps: Gmk cafe
-
![]()
Coleydotmp4
Advice to the community: Absorb as much [recent, within the last year] content/forum posts about keyboards before you buy anything! Don't be afraid to find communities online and ask questions; Everyone in this hobby LOVES what I call “‘splainin”, where people will over-explain anything to anyone to help with keyboard issues/questions.
Current favorite keyboard: Keyboard that I own - my Bakeneko65. Keyboard that I want - Owlab Spring
Current favorite switch: Upgrade Keyboards Crystal Icebergs/ Gateron CJ's / Gateron Vermillion Birds
Current favorite keycap set: Taro!!! So cute.
-
![]()
Jaeyou Park
Advice to the community: The building process is half of the fun in this hobby. I've been focusing more on how I am building the board rather than what board I am building lately and I would encourage you to do the same!
Current favorite keyboard: Is it cheating if I say Jiot? 😜 Duck Blackbird is definitely up there for me.
Current favorite switch: Been loving JWK Quartz and Gateron Oil King these days.
Current favorite keycap set: ePBT Slate with accents!
-
![]()
Jaekeyed
Advice to the community: Enjoy the hobby while spending wisely. Happiness and contentment are not measured by money, but keeping your finances in check as you go deeper into the custom scene is really important.
Current favorite keyboard: NEO87 Luminary - Sun
Current favorite switch: Vintage MX Blacks
Current favorite keycap set: No favorite keycaps since any decent color attracts me as long as it fits my current setup. Although, I always love a well thought out keycap set design. Props to the designers behind these sets.😊
-
![]()
ManoliVisuals
Advice to the community: Don't give in to FOMO and impulsive purchases. It is really easy to just pull the trigger on things you really don't need or actually want, and that can lead to a lot of aggressive spending without even realizing it.
Current favorite keyboard: Satisfaction75
Current favorite switches: SP Star Meteor White or the Alpacas
Current favorite keycaps: GMK Evil Eye
-
![Akuko Labs]()
Timothy (Akuko Labs)
Advice to the community: There’s enough room in this hobby for everyone, regardless of style, interest, or aesthetic. The hobby might sometimes feel insular or like there’s a specific way of doing things, but what I’ve learned over the last two years is that anything goes.
Current favorite keyboard: Thermal Seq 2… it’s that HHKB layout for me 😍
Current favorite switch: Cream Sodas
Current favorite keycaps: MTNU WoB
-
![key.rist]()
key.rist
Advice to the community: Don't be afraid to incorporate bright colours into your setup!
Current favorite keyboard: It's a tie between Matrix Lab Corsa and the Neo65
Current favorite switch: Any HMX switches!
Current favorite keycaps: GMK/SW Foundation
-
![Oh Type]()
Oratio (ohtype)
Advice to the community: Don't forget to have fun with it...it is a hobby after all. ❤️
Current favorite keyboard: Matrix 6XV 3.0 Corsa and Mode Sonnet
Current favorite switch: Mode Obscuras
Current favorite keycaps: This is a tough one...torn between GMK Shanshui, Panels & Mictlán
-
![Tyler Keyboard]()
Tyler Keyboard
Advice to the community: Try to avoid just following all the current keyboard trends. Experimenting pushes the hobby forward and helps you find your own preferences. Be yourself!
Current favorite keyboard: Kohaku
Current favorite switch: Cherry MX Black
Current favorite keycaps: GMK Hineybeige
-
![]()
Karan Chauhan
Advice to the community: It’s a great time to be in the hobby with so many in-stock options and trying out different switches to find your preference is a great place to start.
Current Favourite Keyboard: Luminkey 80
Current Favourite Switches: Cherry MX Hyperglides Blacks
Current Favourite Keycaps: GMK CYL Mictlan
-
![StaceySmash]()
StaceySmash
Advice to the community: The community is full of people eager to share their knowledge. So if you're just starting, don't be afraid to ask questions, chat in streams, go to your local meetups, and try before you buy. Also, don't let others yuck your yum!
Current favorite keyboard: Forever65 by DriftMechanics, 7V by gok, & Owlab Spring
Current favorite switch: Owlab Neons, BSUN BCPs, or anything by Punkshoo
Current favorite keycaps: PBTfans Vior, GMK Coral, Dandy, & Hazakura
-
![Interloper Creative]()
Interloper Creative
Advice to the community: If you like your keyboard, it's a good keyboard. Don't let anyone tell you otherwise.
Current favorite keyboard: Yoot Calliope
Current favorite switch: Cream Sodas and Zykos
Current favorite keycaps: GMK Fright Club and Kaiju
-
![]()
SMKeyboards
Advice to the community: Always remember that this hobby's foundation is personal preference. If you like something, so what if Joeschmo from Instagram comments that your build sounds bad. Also, try your best to avoid FOMO (fear of missing out).
Current favorite keyboard: My daily driver is my O-ring 60% case. Built with Gateron CJ's on a polycarbonate plate. Frosted Blurple acrylic pairing with the GMK Laser Synthwave keycaps.
Current favorite switches: Gateron Ink Blacks
Current favorite keycaps: GMK Oblivion. GMK Metropolis and GMK Dracula are runner-ups.
-
![]()
Stray Chroma
Advice to the community: My advice is to start with things that pique -your- interest and learn at your own pace. There are new things to discover every day, and you don't need to be an expert in order to have fun!
Current favorite keyboard: SALVATION (60%)
Current favorite switch: KTT Strawberries
Current favorite keycap set: KAT Milkshake
-
![]()
Jason Tsay
Advice to the community: The best part of the keyboard journey is trying things for yourself and developing your own preferences. It's okay for your tastes to evolve, so don't worry too much about the echo chamber of other people's opinions.
Current favorite keyboard: Mode Sonnet and modded HHKB Pro 2
Current favorite switch: MX Black (62g long spring) and Gateron Yellow
Current favorite keycap set: GMK WoB with CMYW Modifiers
-
![Extrapriusplease (Evan)]()
Extrapriusplease (Evan)
Advice to the community: Dive in, have fun, your first board won't be perfect. Don't hold yourself to the opinions you had previously, allow yourself to experience new things - a new preference means you're growing!
Current favorite keyboard: Singa Unikorn
Current favorite switch: MX Browns
Current favorite keycaps: GMK Beta
-
![]()
Atoworks Keycaps
Advice to the community: Always be kind, this hobby is incredible and full of so much love.
Current favorite keyboard: Think 6.5v2
Current favorite switches: Marshmallows
Current favorite keycaps: GMK Copper































Resources
Click the plus + to expand the section below.
-
Here’s a list of affiliate links to keyboard vendors. Purchasing through these links helps support the content we make here for you. Thank you.
• KBD Fans
• PK keyboards– use code “modmusings” at checkout for 5% off your purchase
• Keebfront– use code “modmusings” at checkout for 5% off your purchase
• Zenclack– use code “modmusings” at checkout for 5% off your purchase
Here’s a list of other trusted keyboard vendors to check out for in-stock items:
• Omnitype
For a listing of international vendors:
-
Thockstock – track what’s hot and currently in stock across the internet
Mechgroupbuys – Keep track of past, present, and upcoming group buys.
Keycap Calendar – Past, present, and future keycaps catalog.
Matrixzj – A massive catalog of keycaps dating back to 2013.
-
Meetups
Reddit communitiesr/mechmartket
r/customkeyboards
r/mechanicalkeyboards
Discord Groups
Forums
Want to go back to a previous section?
Click below to jump to a section
01. The Anatomy of a Keyboard
02. Keyboard Feel and Sound
03. How to buy a Mechanical Keyboard
04. Mechanical Keyboard Build Guide
05. Hear from the Community
06. Additional Resources
More from modmusings.com